Pages

Monday 8 February 2016

Lantern


This lantern is so stunning and elegant!! I loved adding texture to the window panels (acetate) with an embossing folder. At the top, I used the Pine Bough and 3D Pinecone dies from the new release. I added a jump ring and some twine to make the lantern an ornament. Can you imagine how stunning it will look on the Christmas tree?!!!

There are no boundaries to imagination and creativity……

Products Used:
MTK-CK-5007  Pine Bough (new release)
MTK-CK-5008  3D Pinecone (new release)
MTK-3D-1101  3D Lantern SVG Cut File
Tall Rectangle Gift Box


Isn’t this just the cutest gift box?!! The Winter Snowflakes and Evergreen Branch, which were used to decorate the Tall Rectangle Gift Box are all from MTK. I glittered the snowflakes with stickles and added dimension to the evergreen branches using a stylus. The Flourish “B” tag Set was perfect for layering and stamping my sentiment.

Create your Christmas gift boxes using the products below:
MTK-CK-4098  Evergreen Branch (new release)
MTK-CK-5000  Winter Snowflakes (new release)
MTK-3D-1103  Tall Rectangle Gift Box Digital SVG Cut File
MTK-D-1047  Flourish “B” Tag Set Digital SVG Cut File

Peace On Earth: Christmas Card


I just love making shaker cards! The Wondering Moose die is just beautiful amongst the Douglas Fir Beauties with the rockie mountains in the background. I accented the card with some Pine Boughs and a Winter Snowflake that are glistening with stickles. The dies I used are from MTK.

Chocolate Emergency


Don’t we all need one of these some days?!!
I could use a stock pile of  them! Hop on over to MTK to get this digital svg file to make some for your stash  :)

Stage Card In A Box

Is there ever an end to creativity? Never!! I’m always trying to expand on my creative skills. Every time I make a card, I ponder…..what card style?……what dies will I use?……what do I want my final creation to look like? Then it hits me! Often times, it means me creating my own card style or thinking outside of that comfort level.
This time, I decided I wanted to create my own card in a box style. My design can be found on My Treasured Kutz website under Digital Downloads. Full instructions are below. Happy crafting!!!


Directions:
  1. Cut the card base, 3 long rectangular pieces and the plain rectangle piece in the card stock color of your choice. All should be cut using the same color.
  1. Cut the stitched rectangle and triangles in a coordinating color.
  1. Take your card base and fold on the vertical dotted lines starting from the left (small tab) to right, until you have a box.
  1. Glue the small tab to the inside of the end of the box.
  1. Now you will fold the front flap on the horizontal dotted line down to open the front of the box.
  1. Fold the left and right flap on the dotted lines to finish opening the box.
  1. Take your 3 long strips and fold on the dotted lines to form a ” I_____I ” shape. These will then be glued at different heights on the inside of the card to give more depth when decorated.
  1. Glue your stitched layers on to the front and side flaps.
  1. You can now add your sentiment to the plain rectangle mat which you will add to the flap with glue or pop dots.
  1. You are now ready to decorate the layers that you added inside the box. Choose the die cuts you want to decorate with and begin to glue them to the strips that you have inside the box.
You’re card is complete & ready to give to someone special!   :)

Graduation Time

Isn’t Abnor Armstrong the cutest graduate?!! It’s time to get ready for graduation time and what better than a chalkboard style card.


I created this card using cork board for the base with chalkboard cardstock on top. The white inking of the words is heat embossed in clear. The graduation hats are just stamped in white and after drying, I used chalk on the surface and smudged it to give it a more chalkboard look.
Abnor Armstrong can be found in the die section of MTK.

Rockstar Licence Plate Shaker

My creative mind is always in full speed! I created this shaker card in an SVG format that can be found under the Digital Downloads section at MTK…just follow the link on the right sidebar. Once you have your download you can follow the directions below to create this fabulous card. Happy crafting!!   :)


1.  Cut out your card base in the color of card stock you prefer. Your color choice will be your base in the licence plate frame (I used white). Fold on the dotted line.
2.  Then cut out your license plate frame…..for this I chose to use chrome card stock.
3.  Cut out the solid rounded rectangle in acetate.
4.  The larger circles with holes are your record bases and the smaller circles with holes are the record labels. I have cut my record bases in black and the labels can be cut in your choice of color. Glue the labels to your records bases.
5.  Next cut your music notes using the MTK-CK-4066 Musical Notes die.
6.  Now it’s time for assembly! Glue the license plate frame to the acetate rectangle. Once it dries, poke holes in the acetate where the corner plate frame holes are. Place brads in the holes.
7.  Apply foam tape just inside of the edge of  your card base, forming a square box shape (this will be your shaker). Do not remove the film off the top of the tape.
8.  Add your records, music notes, sequins & seed beads to the inside of the shaker square, keeping them away from the foam tape edge.
9.  Now remove the film off the tape & apply your license plate frame.
Your shaker card is now complete and ready for a sentiment on the inside  :)

Golf Dad

Does your dad love golf? He will absolutely love this card!


I began this card using the  Golf Cart and  “Four” Clubs & Bag dies from My Treasured Kutz. Both are a sneak peek at what’s coming in their new launch. On each die cut I used Glossy Accents to give them some shine.


The MTK-DC-1067 Fairway Background Card Digital SVG Cut File will make dad feel like he’s on the course. I applied sand to the sand pits and used pop dots to create a layered effect.

Happy "I Do" Day

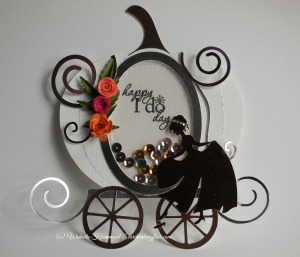
Don’t you just love this carriage?!!


This shaker card was made using metalic card stock for the accents to give it a touch of class for that special day. Beautiful Princess Cinde is an amazing die. She is a beautiful accent to the Pumpkin Carriage Outside Shaker Card. The svg file and dies I used are from MTK.

Say It With A Bouquet!

I just love the miniature flower dies from MTK!! For this card, I designed a full bouquet of flowers  and added some butterflies and crystal accents.


Dies Used:

Mom

Here’s a sneak peek at some great new flower dies and SVG cut file available at My Treasured Kutz!


 It is so important to recognize the wonderful moms in our lives and this is a quick, easy Mother’s Day shaker card will melt her heart!!


Shadow Box Card: Easter Blessings

Many of our holidays started with religion and throughout the years have somehow lost their meaning. I have made this card to bring the meaning back to a very widely celebrated holiday.


 I began this shadow box type card using the MTK  “Message Of Grace” and  “Christian Fish” dies and after cutting each one, I made base layers for them. Afterwards I distressed each of them (including base layer) with Tim Holtz distressed inks, as I did with each  layer of this card.


 The flowers are cut from a Stampin’ Up flower punch, which I then also distressed with ink and used a water brush to add the texture lines. Using a stylus I gave each flower texture and added a brad for the centers. The leaf flourishes are from Memory Box. The card was completed with over 100 flat back pearls. All the elements and layers come together and give this card great depth and definition.
 

Birthday Boy

Do you always find it hard making cards for boys?


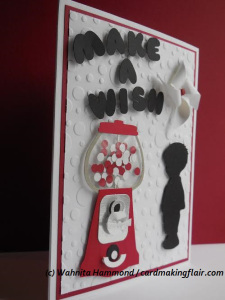
 Try using the Bubblegum Alphabet and the boy silhouette from the Cutie Pies die that is found on MTK‘s website. There’s no end to the designs you can make. Isn’t he just the cutest?!!!


This A7 card is layered and dry embossed. The elements on the card are all pop dotted and the card is completed with a cute pinwheel as an accent.
The bubblegum machine is another of my own cut designs that I have been working on. What do you think of  it? Would love any comments or suggestions you may have.


Be My Valentine


What’s a valentine without music and hearts…….the beautiful heart collage and nature’s melody die cuts are from MTK.


 The vinyl records and album cover are the first of my own die cut designs that I am working on. The card is an A7 size and the base has 3 colored layers added. The records (with album sleeve) are then glued on and the nature’s melody is added, overlapping the album sleeve. To finish it off, I added pop dots behind the heart collage to make it pop.

Grand Wedding


Every wedding has a limousine, bride & groom, and lets not forget the lovely walk up the grand staircase past the wall of ivy. The “pièce de résistance” is the grand windows!All of these dies are from MTK.
To make the grand windows, I took my die cut, then cut a base layer out of acetate and  glued both layers together. Then using my Chameleon pens, I colored the back side to create the stained glass effect.
The brick wall was created using a stampin’ up ink pad and dabbing it on a Tim Holtz embossing folder before running it through my bigshot, giving it an aged look.

Majestic Mountain Range


I am really excited to introduce a new line of dies! Majestic Mountain Range is just one of the great dies you will find at My Treasured Kutz (MTK)
For a full video tutorial, click here


List of supplies used:
  1. MTK  –  Majestic Mountain Range die
  2. Card stock  –  8 1/2 x 11″sheet
  3. Acetate
  4. Photo paper
  5. Stampscapes Stamps  –  Rocky Mountain Peeks & Lakeside Cove
  6. Clear Snap ColorBox Stylus & Leaf  foam tips
  7. Ink Pads  –  Momento: tuxedo black        Adirondack: aqua      Tim Holtz Distress: iced spruce, pumice stone, tumbled glass, salty ocean, faded jeans, and chipped sapphire       Stampin' Up: old olive

Wedding Card


For this wedding card I was asked to make it more like a gift. So I broke out the Silhouette Cameo and some great dies to get started. The flowers were made using a cuttlebug quilling kit and the edges brushed with Wink Of Stella. The fancy oval and silhouette of couple were cut on my Silhouette. The wedding rings were my own design using a crystal for bling on the one ring. The ivy is a great die from Cottage Cutz that finished the card and box beautifully. With a touch of pearl accents to both the card and box, the card was perfect for gift giving!

Serenity.......Stampscapes Stamps


Just love creating scenes with the Stampscapes stamps!!

Ducks Unlimited Auction Cards


People truly can appreciate the work put into handmade cards…….one set of these raised $90 and the second set was in the raffle prizes.

Dreyer Sheet card #2


I just love the dryer sheet technique! Instructions can be found under the “Tutorial” heading.

Penny Farthing


This has to be the best bicycle die! It’s called “Antique Bike” by Memory Box


Flowers A Flutter


Create beautiful flowers using the Blossom Petals XL punch from Stampin’ Up

Dryer Sheet Card

Use your old dryer sheets and create a masterpiece.